




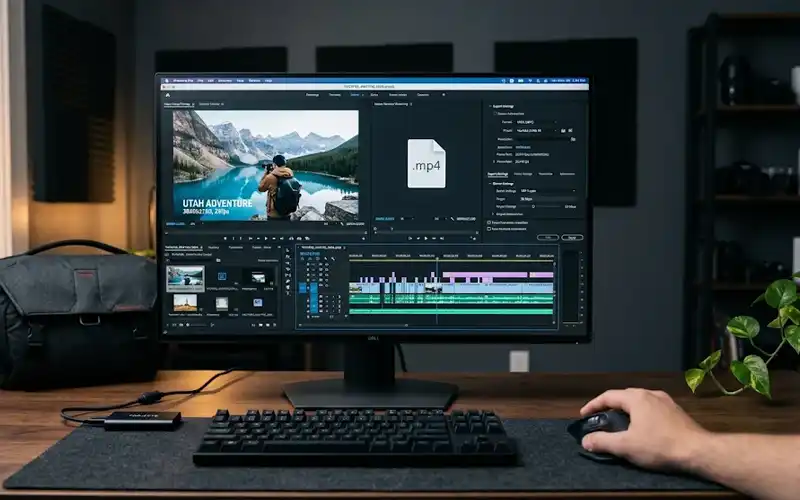
You spent hours on the edit, pressed upload, and the video on YouTube looks softer than the file on your computer. In most cases the problem is not YouTube. It is the file you gave it.
The good news is that the right choice is simple, and only a handful of settings really matter. This guide gives you the exact container, codec, bitrate, resolution and frame rate to use, then shows you how to export in popular editors and how to fix the upload problems people run into most often.
Quick answer: Export an MP4 file with H.264 video and AAC-LC audio. Keep the frame rate you recorded, match the resolution to your footage, and choose a bitrate from the bitrate section further down.
Container vs Codec: What Is the Difference?
People often treat format as one thing, but a video file is really two layers. The container is the outer shell, a shipping box that holds the picture, the sound and extras such as subtitles or chapter marks. MP4, MOV, MKV and AVI are containers. The codec is the method used to compress what sits inside. H.264 and HEVC compress video, while AAC and Opus compress audio, and the codec decides how sharp the picture looks for a given file size.
This is why two files that both end in .mp4 can behave very differently. One may hold H.264 video and play everywhere, while the other holds a rarely supported codec and fails to upload. It also explains why renaming a file from .mov to .mp4 does nothing: the extension is only a label on the box, and the contents stay the same until you export or convert the file properly.
So the full answer to the best format question is a container plus a video codec plus an audio codec. MP4 with H.264 and AAC-LC wins because nearly every camera, phone, editor and playback device understands it. Files stay reasonably small, uploads finish sooner, and YouTube spends less time processing them.
YouTube’s Recommended Upload Settings
For a standard horizontal video, YouTube recommends an MP4 container with H.264 video in progressive scan and High Profile. Audio should be AAC-LC, either stereo or 5.1 surround, at 48 kHz (96 kHz is also accepted). Use a 16:9 aspect ratio, a resolution of 1920×1080 or higher that matches your footage, and a frame rate that matches your source, such as 24, 25, 30, 48, 50 or 60 fps.
You may also see advice about placing the moov atom at the front of the file. It sounds technical, but every modern editor handles this for you when you export an MP4 with H.264, so you rarely need to touch it.
One rule matters more than the rest: never change the frame rate just to match a guide. If you filmed at 24 fps, export at 24 fps. Converting to 30 fps forces the software to invent or drop frames, which can cause visible stutter during smooth camera moves.
Best Bitrate for YouTube by Resolution
Bitrate is the amount of data used for each second of video. When it is too low, fine detail turns into blocks and smears, especially in fast motion, water, grass and confetti. For standard dynamic range (SDR) video, aim for at least 8 Mbps at 1080p when your frame rate is 24, 25 or 30, and 12 Mbps for 48, 50 or 60 fps. At 1440p the figures rise to 16 and 24 Mbps, and at 4K you need roughly 35 to 45 Mbps for standard frame rates and 53 to 68 Mbps for high ones.
High dynamic range (HDR) footage needs more data. At 1080p, use 10 Mbps for standard frame rates and 15 Mbps for high ones. At 1440p, use 20 and 30 Mbps, and at 4K use about 44 to 56 Mbps and 66 to 85 Mbps.
These values are targets rather than ceilings, so going a little higher is safe and often helps with busy scenes. A talking-head video with a static background looks fine near the lower end, while gaming, sports and travel footage benefit from the higher end. Since YouTube re-compresses every upload anyway, there is no gain in sending an enormous file, and because settings can change over time, glance at YouTube’s own upload recommendations before you build a permanent export preset.
MP4, MOV and ProRes: Which Format to Use
YouTube accepts many containers, but they are not equally good choices. MP4 is the best option for final uploads. It is small, widely supported and quick to process, and its only real weakness is that it is slightly less suited to heavy editing work.
MOV is the favorite of Mac users and Final Cut Pro workflows, and it is often used for master files. YouTube accepts it without trouble, but the files are larger and sometimes cause playback problems on Windows.
ProRes is a professional editing and archiving format that keeps excellent quality, but the files are enormous and uploads can take forever. If your workflow demands MOV or ProRes while you edit, that is fine, but export the finished video as MP4.
MKV, AVI and WebM: Formats to Avoid
MKV is the default output of OBS and many screen recorders. It is not on YouTube’s official list, and although it often uploads fine, it can fail or lose audio tracks. If you record with OBS, change the output container to MP4 or use its remux option, so you avoid a separate conversion step later.
AVI is an old format that produces huge files and relies on outdated compression, so use it only when you are stuck with legacy footage or a tool that insists on it. WebM was designed for web playback, which makes it fine for website animations but poorly supported by editors and not ideal for long videos.
Should You Upload in 1080p or 4K?
The answer depends on what you shot and how much time and storage you are willing to spend. There are good reasons to choose 4K. Higher-resolution uploads tend to be served with more efficient codecs and richer bitrates, so even viewers on a 1080p screen can see a cleaner picture. Your video also stays sharp on large TVs and monitors, and it ages better as screens improve.
There are equally good reasons to stay at 1080p. The files are far smaller, so uploads and processing finish faster. Editing is smoother on an average computer, and most viewers watch on phones, where the difference is hard to notice.
A sensible rule is to upload in the resolution you filmed. If you shot in 4K and your computer can handle it, export in 4K. If you shot in 1080p, export in 1080p, and never upscale it to 4K, because that adds file size without adding any real detail.
Best Format for YouTube Shorts and Vertical Video
Shorts follow the same technical recipe as regular videos, just in a different shape. Export an MP4 with H.264 video and AAC-LC audio at 1080×1920 (9:16), keeping the frame rate of your source, which is usually 30 or 60 fps. Square clips also work, and a Short can currently run up to 3 minutes.
YouTube treats a clip as a Short only when it is square or vertical, so a horizontal file will be published as a regular video. Frame your shot vertically from the start instead of cropping a landscape video later, since cropping throws away resolution and often cuts off faces or captions. Rules and length limits for Shorts have changed more than once, so check the current limit before you plan longer clips.
Export Settings in Premiere Pro and DaVinci Resolve
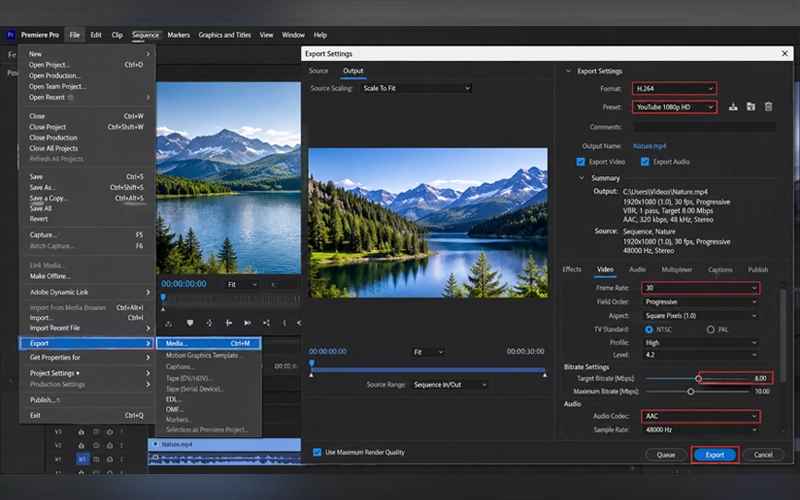
Every editor uses different menu names, but the target is always the same: H.264, MP4, your source frame rate and a sensible bitrate. In Adobe Premiere Pro, go to File, then Export, then Media, and set the format to H.264. Pick a preset such as Match Source – High bitrate or the YouTube 1080p preset, confirm on the Video tab that the frame rate matches your sequence, and set a target bitrate that fits your resolution. On the Audio tab, choose AAC at 48 kHz in stereo, then click Export.
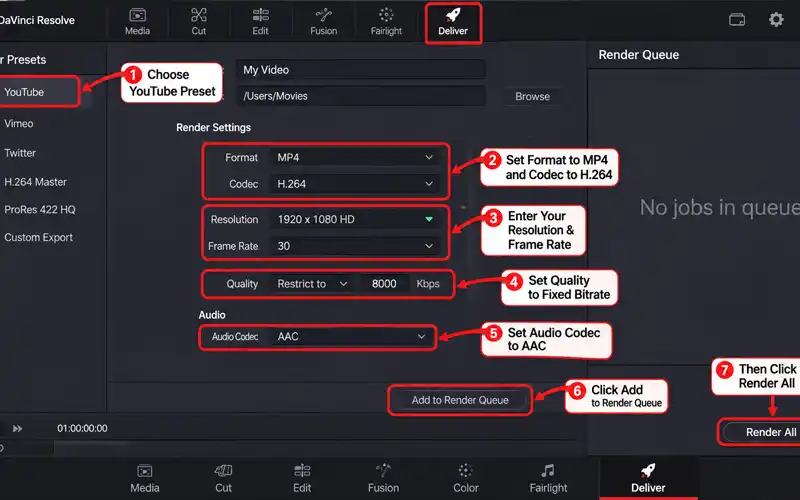
In DaVinci Resolve, open the Deliver page and either pick the YouTube preset or build a custom export. Set the format to MP4 and the codec to H.264, enter your resolution and frame rate, and restrict the quality to a fixed bitrate. Set the audio codec to AAC, click Add to Render Queue, and then choose Render All.
Export Settings in CapCut, Final Cut Pro and on Your Phone
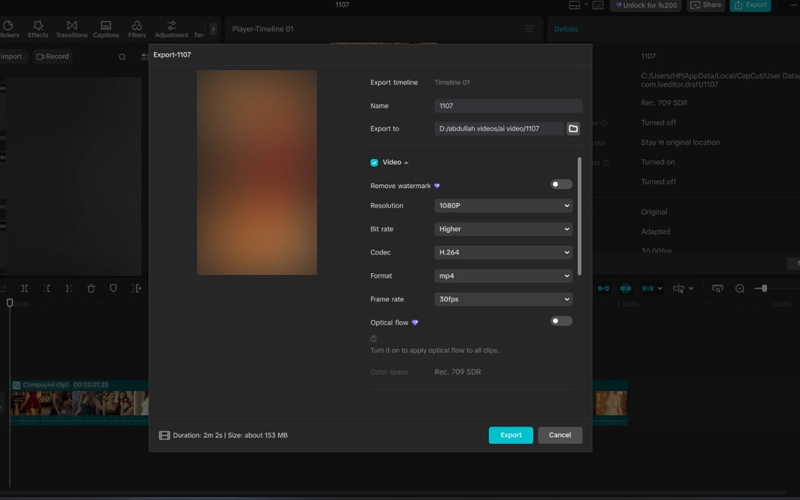
In CapCut on desktop, click Export in the top right corner and choose your resolution, bitrate, codec (H.264), format (MP4) and frame rate before confirming. On mobile, tap the resolution button at the top, set the resolution and frame rate, and export. The mobile options are simpler, so choose the highest resolution that matches your footage.
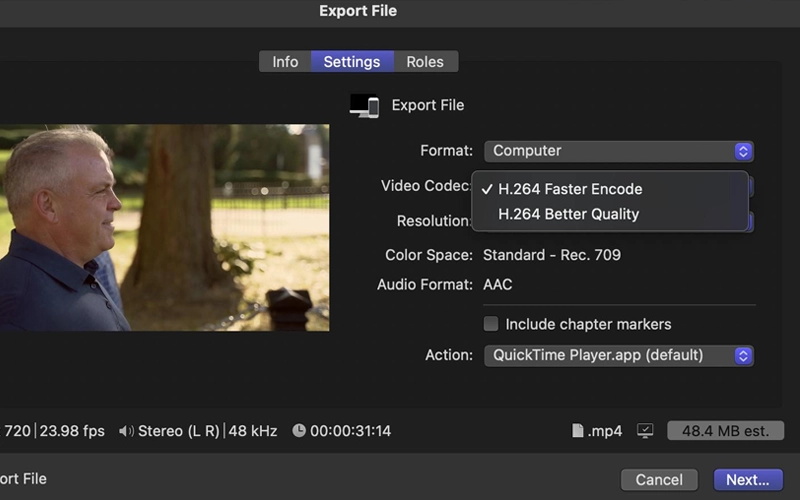
In Final Cut Pro, choose File, then Share, then Master File. Set the format to Computer and the video codec to H.264, using the better-quality option if you are not in a hurry. Match the resolution to your project, click Next and save the file.
If you record on an iPhone and plan to upload without editing, open Settings, then Camera, then Formats, and choose Most Compatible, which records in H.264 instead of HEVC. On Android, look for a high-efficiency or HEVC toggle in the camera settings and turn it off if you run into compatibility trouble.
How to Convert a Video to MP4
Sometimes a file arrives in the wrong format, such as a screen recording in MKV or an older camera clip in AVI. The cleanest fix is to re-export it from your editor, because you control the codec, bitrate and frame rate in one step.
If you do not have an editor, HandBrake is a reliable free tool. Open the file, pick a preset such as Fast 1080p30 (or a higher one for 4K), set the format to MP4, the video encoder to H.264, and the frame rate to Same as source, then start the encode. VLC can also do the job through Media, then Convert/Save, where you add your file, choose an H.264 profile and run the conversion.
Always keep a copy of the original. Each conversion compresses the video again, so you want a clean master to return to if something goes wrong.
Common Mistakes That Make YouTube Videos Look Blurry
Most soft or blocky uploads trace back to a few habits. The biggest culprit is a bitrate set too low, which hurts fast action most of all. Close behind is re-exporting a file that was already compressed. Every extra round of compression removes detail, so always export from the original project or a high-quality master.
Noisy or grainy footage is a hidden problem too, because grain eats bitrate that should go to real detail, so denoise lightly before exporting. Many built-in web and social presets also cap the bitrate far below what YouTube recommends, so check the actual numbers instead of trusting a preset by its name.
Troubleshooting Common Upload Problems
If your video looks blurry right after upload, the HD versions are probably still processing. Wait until the 1080p or 4K option appears in the quality menu before judging the result. If the upload itself is painfully slow, the file is likely too large or your connection is weak, so lower the bitrate slightly or upload overnight on a stable connection.
When processing never finishes or YouTube reports an unsupported format, the file probably contains an unusual codec or is damaged, so re-export it as MP4 with H.264 and AAC and try again. If the audio drifts out of sync, the cause is usually variable frame rate footage, which is common with phones and screen recorders, so convert the clip to a constant frame rate before editing. If your video appears cropped or surrounded by black bars, the aspect ratio is wrong, so export 16:9 for standard videos or 9:16 for Shorts.
Before You Upload: A Quick Final Check
Take two minutes to play the exported file itself, not the project preview, which is often a lower-quality proxy. Watch the first ten seconds, a few cuts in the middle and the ending, and listen for missing channels, clipped words or unexpectedly quiet sections. Confirm that the frame rate and resolution match your footage and that on-screen text is readable at phone size.
Frequently Asked Questions
Is MP4 the best format for YouTube?
Yes, for almost everyone. MP4 with H.264 video and AAC-LC audio is the safest and most widely supported combination.
Is MOV okay for YouTube?
Yes, YouTube accepts MOV files, but they are larger and sometimes cause playback trouble on Windows, so MP4 is the easier choice for a finished upload.
What is the best bitrate for YouTube videos?
It depends on resolution and frame rate, but about 8 Mbps is a solid minimum for 1080p at standard frame rates. Fast-moving footage benefits from the higher end of the ranges above.
Should I upload in 4K or 1080p?
Upload in the resolution you filmed. If you shot in 4K, it usually gives a cleaner result even on smaller screens.
Which video formats does YouTube support?
Beyond MP4 and MOV, YouTube accepts AVI, WMV, FLV, WebM, MPEG-PS, 3GPP, and professional formats such as DNxHR, CineForm and HEVC. Not every container is equally reliable, so MP4 with H.264 is the safest path.
What is the maximum video file size and length on YouTube?
The limit is 256 GB or 12 hours, whichever is smaller. Verified accounts can upload longer videos, though most creators never reach these limits.
What is the best format for YouTube Shorts?
The same MP4 recipe, framed vertically at 1080×1920. Check the current length limit before you plan longer clips.
Conclusion
Choosing the right format takes one decision: MP4 with H.264 and AAC-LC. Everything else is simply matching the settings to your footage and checking the exported file before you hit upload.
Save your preferred settings as an export preset in your editor so you never have to think about them again. Your next upload will look the way you intended.